1. From Didier Stevens' post MD5 56ad7b243511ee7398d43df7643dc904 SHA-1 ae5ab7798ca267b1265a0496c562f219821d17cf SHA-256 3fd4aa339bdfee23684ff495d884aa842165e61af85fd09411abfd64b9780146 2. From Proofpoint
"snmpcheck is a free open source utility to get information via SNMP protocols. It works fine against Windows, Linux, Cisco, HP-UX, SunOS systems and any devices with SNMP protocol support. It could be useful for penetration testing or systems monitoring. snmpcheck has been tested on GNU/Linux, *BSD, Windows systems and Cygwin. snmpcheck is distributed under GPL license and based on Athena-2k script by jshaw. " read more...
This Video is absolutely for Educational Purposes only, please don't do any illegal activity. If you do then I'm not responsible for your illegal activity. The purpose of this video is to show you How hackers can hack your social media by using their own local servers.
Basically these type of attacks known as Social Engineering attacks or Phishing. Attacker just send the duplicate vulnerable HTML page to the victim, when victim enters any type of information to that vulnerable page it'll automatically received by the attacker.
Phishing is a form of fraud in which an attacker masquerades as a reputable entity or person in email or other communication channels. The attacker uses phishing emails to distribute malicious links or attachments that can perform a variety of functions, including the extraction of login credentials or account information from victims.
How phishing works
Phishing attacks typically rely on social networking techniques applied to email or other electronic communication methods, including direct messages sent over social networks, SMS text messages and other instant messaging modes.
Phishers may use social engineering and other public sources of information, including social networks like LinkedIn, Facebook and Twitter, to gather background information about the victim's personal and work history, his interests, and his activities.
Hacking by PHP
As PHP is server side scripting language so first of all you have need to install a local server (WAMP, XAMPP or LAMPP) over your system. Because if there is no any server running on your system then you can't even run your PHP script. So if you wanna do a programming with PHP this is the first step to download and install a server from the Internet. You can easily download and install servers by watching my videos. Just visit my YouTube channel and watch there.
Hacking Facebook By Using PHP Script | Social Engineering Attack | You can perform this attack over LAN and WAN (Same or Different Networks)
"A powerful, flexible, and fast multi-platform password hash cracker John the Ripper is a fast password cracker, currently available for many flavors of Unix (11 are officially supported, not counting different architectures), DOS, Win32, BeOS, and OpenVMS. Its primary purpose is to detect weak Unix passwords. It supports several crypt(3) password hash types which are most commonly found on various Unix flavors, as well as Kerberos AFS and Windows NT/2000/XP LM hashes. Several other hash types are added with contributed patches. You will want to start with some wordlists, which you can find here or here. " read more...
What is BurpSuite? Burp Suite is a Java based Web Penetration Testing framework. It has become an industry standard suite of tools used by information security professionals. Burp Suite helps you identify vulnerabilities and verify attack vectors that are affecting web applications. Because of its popularity and breadth as well as depth of features, we have created this useful page as a collection of Burp Suite knowledge and information.
In its simplest form, Burp Suite can be classified as an Interception Proxy. While browsing their target application, a penetration tester can configure their internet browser to route traffic through the Burp Suite proxy server. Burp Suite then acts as a (sort of) Man In The Middle by capturing and analyzing each request to and from the target web application so that they can be analyzed.
Everyone has their favorite security tools, but when it comes to mobile and web applications I've always found myself looking BurpSuite . It always seems to have everything I need and for folks just getting started with web application testing it can be a challenge putting all of the pieces together. I'm just going to go through the installation to paint a good picture of how to get it up quickly.
BurpSuite is freely available with everything you need to get started and when you're ready to cut the leash, the professional version has some handy tools that can make the whole process a little bit easier. I'll also go through how to install FoxyProxy which makes it much easier to change your proxy setup, but we'll get into that a little later.
Requirements and assumptions:
Mozilla Firefox 3.1 or Later Knowledge of Firefox Add-ons and installation The Java Runtime Environment installed
Download BurpSuite from http://portswigger.net/burp/download.htmland make a note of where you save it.
on for Firefox from https://addons.mozilla.org/en-US/firefox/addon/foxyproxy-standard/
If this is your first time running the JAR file, it may take a minute or two to load, so be patient and wait.
Video for setup and installation.
You need to install compatible version of java , So that you can run BurpSuite.
Sub-domain takeover vulnerability occur when a sub-domain (subdomain.example.com) is pointing to a service (e.g: GitHub, AWS/S3,..) that has been removed or deleted. This allows an attacker to set up a page on the service that was being used and point their page to that sub-domain. For example, if subdomain.example.com was pointing to a GitHub page and the user decided to delete their GitHub page, an attacker can now create a GitHub page, add a CNAME file containing subdomain.example.com, and claim subdomain.example.com. For more information: here Installation:
# git clone https://github.com/m4ll0k/takeover.git
# cd takeover
# python takeover.py
There are many goodware and malware developed in pascal, and we will see that the binary generated by the pascal compilers is fascinating, not only because the small and clean generated binaries, or the clarity of the pascal code, but also the good performance. In Linux we have Lazarus which is a good free IDE like Delphi and Kylix the free pascal IDE for windows.
The program:
program strtest; var cstr: array[0..10] of char; s, s2: ShortString; begin cstr := 'hello world'; s := cstr; s2 := 'test'; WriteLn(cstr + ' ' + s + ' ' + s2); end.
We are going to compile it with freepascal and lazarus, and just the binary size differs a lot:
And surprisingly turbopascal binaries are extremely light. Lets start with lazarus:
Logically it imports from user32.dll some display functions, it also import the kernel32.dll functions and suspiciously the string operations of oleaut32.dll
And our starting point is a function called entry that calls the console initialization and retrieve some console configurations, and then start a labyrinth of function calls.
On functions 10000e8e0 there is the function that calls the main function.
I named execute_param2 because the second param is a function pointer that is gonna be executed without parameters, it sounds like main calling typical strategy. And here we are, it's clearly the user code pascal main function.
What it seems is that function 100001800 returns an string object, then is called its constructor to initialize the string, then the string is passed to other functions that prints it to the screen.
This function executes the method 0x1c0 of the object until the byte 0x89 is a null byte. What the hell is doing here? First of all let's create the function main:
Simply right button create function:
After a bit of work on Ghidra here we have the main:
Note that the struct member so high like 0x1b0 are not created by default, we should import a .h file with an struct or class definition, and locate the constructor just on that position.
The mysterious function was printing byte a byte until null byte, the algorithm the compiler implemented in asm is not as optimized as turbopascal's.
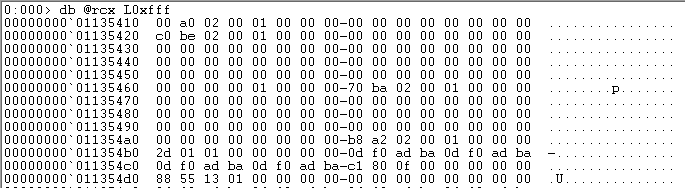
In Windbg we can see the string object in eax after being created but before being initialized:
Just before executing the print function, the RCX parameter is the string object and it still identical:
Let's see the constructor code. The constructor address can be guessed on static walking the reverse-cross-references to main, but I located it in debugging it in dynamic analysis.
The constructor reads only a pointer stored on the string object on the position 0x98.
And we have that the pointer at 0x98 is compared with the address of the literal, so now we know that this pointer points to the string. The sentence *string_x98 = literal confirms it, and there is not memory copy, it only points reusing the literal.
Freepascal
The starting labyrinth is bigger than Lazarus so I had to begin the maze from the end, searching the string "hello world" and then finding the string references:
There are two ways to follow the references in Ghidra, one is [ctrl] + [shift] + F but there is other trick which is simply clicking the green references texts on the disassembly.
At the beginning I doubted and put the name possible_main, but it's clearly the pascal user code main function.
The char array initialization Is converted by freepascal compiler to an runtime initialization using mov instructions.
Reducing the coverage on dynamic we arrive to the writeln function:
EAX helds a pointer to a struct, and the member 0x24 performs the printing. In this cases the function can be tracked easily in dynamic executing the sample.
And lands at 0x004059b0 where we see the WriteFile, the stdout descriptor, the text and the size supplied by parameter.
there is an interesting logic of what happens if WriteFile() couldn't write all the bytes, but this is other scope. Lets see how this functions is called and how text and size are supplied to figure out the string object.
EBX helds the string object and there are two pointers, a pointer to the string on 0x18 and the length in 0x18, lets verify it on windbg.
And here we have the string object, 0x0000001e is the length, and 0x001de8a68 is the pointer.
After the rust string overview of its internal substructures, let's see if c++ QString storage is more light, but first we'r going to take a look to the c++ standard string object:
At first sight we can see the allocation and deallocation created by the clang++ compiler, and the DAT_00400d34 is the string.
If we use same algorithm than the rust code but in c++:
We have a different decompilation layout. Note that the Ghidra scans very fast the c++ binaries, and with rust binaries gets crazy for a while. Locating main is also very simple in a c++ compiled binary, indeed is more low-level than rust.
The byte array is initialized with a simply move instruction: 00400c4b 48 b8 68 MOV RAX,0x6f77206f6c6c6568
And basic_string generates the string, in the case of rust this was carazy endless set of calls, detected by ghidra as a runtime, but nevertheless the basic_string is an external imported function not included on the binary.
The string is on the stack, and it's very curious to see what happens if there are two followed strings like these:
auto s = string(cstr);
string s2 = "test";
Clang puts toguether both stack strings: [ptr1][sz1][string1][null][string2][null][ptr2][sz2]
C++ QString datatype
Let's see the great and featured QString object defined on qstring.cpp and qstring.h
Some QString methods use the QCharRef class whose definition is below:
class Q_EXPORT QCharRef {
    friend class QString;
    QString& s;
    uint p;
Searching for the properties on the QString class I've realized that one improvement that rust and golang does is the separation from properties and methods, so in the large QString class the methods are hidden among the hundreds of methods, but basically the storage is a QStringData *;
After removing the methods of QStringData class definition we have this:
struct Q_EXPORT QStringData : public QShared { QChar *unicode; char *ascii; #ifdef Q_OS_MAC9 uint len; #else uint len : 30;
Bob was tasked to break into XYZcorporation, so he pulled up the facility on google maps to see what the layout was. He was looking for any possible entry paths into the company headquarters. Online maps showed that the whole facility was surrounded by a security access gate. Not much else could be determined remotely so bob decided to take a drive to the facility and get a closer look.
Bob parked down the street in view of the entry gate. Upon arrival he noted the gate was un-manned and cars were rolling up to the gate typing in an access code or simply driving up to the gate as it opening automatically.Interestingly there was some kind of wireless technology in use.
How do we go from watching a car go through a gate, to having a physical device that opens the gate?
We will take a look at reversing a signal from an actual gate to program a remote with the proper RF signal.Learning how to perform these steps manually to get a better understanding of how RF remotes work in conjunction with automating processes with RFCrack.
In the the previous blogs, we sniffed signals and replayed them to perform actions. In this blog we are going to take a look at a signal and reverse it to create a physical device that will act as a replacement for the original device. Depending on the scenario this may be a better approach if you plan to enter the facility off hours when there is no signal to capture or you don't want to look suspicious.
Recon:
Lets first use the scanning functionality in RFCrack to find known frequencies. Weneed to understand the frequencies that gates usually use. This way we can set our scanner to a limited number of frequencies to rotate through. The smaller rage of frequencies used will provide a better chance of capturing a signal when a car opens the target gate. This would be beneficial if the scanning device is left unattended within a dropbox created with something like a Kali on a Raspberry Pi. One could access it from a good distance away by setting up a wifi hotspot or cellular connection.
Based on research remotes tend to use 315Mhz, 390Mhz, 433Mhz and a few other frequencies. So in our case we will start up RFCrack on those likely used frequencies and just let it run. We can also look up the FCID of our clicker to see what Frequencies manufactures are using. Although not standardized, similar technologies tend to use similar configurations. Below is from the data sheet located at https://fccid.io/HBW7922/Test-Report/test-report-1755584 which indicates that if this gate is compatible with a universal remote it should be using the 300,310, 315, 372, 390 Frequencies. Most notably the 310, 315 and 390 as the others are only on a couple configurations.
RFCrack Scanning:
Since the most used ranges are 310, 315, 390 within our universal clicker, lets set RFCrack scanner to rotate through those and scan for signals.If a number of cars go through the gate and there are no captures we can adjust the scanner later over our wifi connection from a distance.
Currently Scanning: 433000000 To cancel hit enter and wait a few seconds
Example of logging output:
From the above output you will see that a frequency was found on 390. However, if you had left this running for a few hours you could easily see all of the output in the log file located in your RFCrack/scanning_logs directory.For example the following captures were found in the log file in an easily parseable format:
Analyzing the signal to determine toggle switches:
Ok sweet, now we have a valid signal which will open the gate. Of course we could just replay this and open the gate, but we are going to create a physical device we can pass along to whoever needs entry regardless if they understand RF. No need to fumble around with a computer and look suspicious.Also replaying a signal with RFCrack is just to easy, nothing new to learn taking the easy route.
The first thing we are going to do is graph the capture and take a look at the wave pattern it creates. This can give us a lot of clues that might prove beneficial in figuring out the toggle switch pattern found in remotes. There are a few ways we can do this. If you don't have a yardstick at home you can capture the initial signal with your cheap RTL-SDR dongle as we did in the first RF blog. We could then open it in audacity. This signal is shown below.
Let RFCrack Plot the Signal For you:
The other option is let RFCrack help you out by taking a signal from the log output above and let RFCrack plot it for you.This saves time and allows you to use only one piece of hardware for all of the work.This can easily be done with the following command:
From the graph output we see 2 distinct crest lengths and some junk at either end we can throw away. These 2 unique crests correspond to our toggle switch positions of up/down giving us the following 2 possible scenarios using a 9 toggle switch remote based on the 9 crests above:
Possible toggle switch scenarios:
down down up up up down down down down
up up down down down up up up up
Configuring a remote:
Proper toggle switch configuration allows us to program a universal remote that sends a signal to the gate. However even with the proper toggle switch configuration the remote has many different signals it sends based on the manufacturer or type of signal.In order to figure out which configuration the gate is using without physically watching the gate open, we will rely on local signal analysis/comparison.
Programming a remote is done by clicking the device with the proper toggle switch configuration until the gate opens and the correct manufacturer is configured. Since we don't have access to the gate after capturing the initial signal we will instead compare each signal from he remote to the original captured signal.
Comparing Signals:
This can be done a few ways, one way is to use an RTLSDR and capture all of the presses followed by visually comparing the output in audacity. Instead I prefer to use one tool and automate this process with RFCrack so that on each click of the device we can compare a signal with the original capture. Since there are multiple signals sent with each click it will analyze all of them and provide a percent likelihood of match of all the signals in that click followed by a comparing the highest % match graph for visual confirmation. If you are seeing a 80-90% match you should have the correct signal match.
Note:Not every click will show output as some clicks will be on different frequencies, these don't matter since our recon confirmed the gate is communicating on 390Mhz.
In order to analyze the signals in real time you will need to open up your clicker and set the proper toggle switch settings followed by setting up a sniffer and live analysis with RFCrack:
Open up 2 terminals and use the following commands:
#Setup a sniffer on 390mhz Setup sniffer:python RFCrack.py -k -c -f 390000000.
#Monitor the log file, and provide the gates original signal Setup Analysis: python RFCrack.py -c -u 1f0fffe0fffc01ff803ff007fe0fffc1fff83fff07ffe0007c -n.
Cmd switches used
-k = known frequency
-c = compare mode
-f = frequency
-n = no yardstick needed for analysis
Make sure your remote is configured for one of the possible toggle configurations determined above. In the below example I am using the first configuration, any extra toggles left in the down position: (down down up up up down down down down)
Analyze Your Clicks:
Now with the two terminals open and running click the reset switch to the bottom left and hold till it flashes. Then keep clicking the left button and viewing the output in the sniffing analysis terminal which will provide the comparisons as graphs are loaded to validate the output.If you click the device and no output is seen, all that means is that the device is communicating on a frequency which we are not listening on.We don't care about those signals since they don't pertain to our target.
At around the 11th click you will see high likelihood of a match and a graph which is near identical. A few click outputs are shown below with the graph from the last output with a 97% match.It will always graph the highest percentage within a click.Sometimes there will be blank graphs when the data is wacky and doesn't work so well. This is fine since we don't care about wacky data.
You will notice the previous clicks did not show even close to a match, so its pretty easy to determine which is the right manufacture and setup for your target gate. Now just click the right hand button on the remote and it should be configured with the gates setup even though you are in another location setting up for your test.
For Visual of the last signal comparison go to ./imageOutput/LiveComparison.png
----------Start Signals In Press--------------
Percent Chance of Match for press is: 0.05
Percent Chance of Match for press is: 0.14
Percent Chance of Match for press is: 0.14
Percent Chance of Match for press is: 0.12
----------End Signals In Press------------
For Visual of the last signal comparison go to ./imageOutput/LiveComparison.png
----------Start Signals In Press--------------
Percent Chance of Match for press is: 0.14
Percent Chance of Match for press is: 0.20
Percent Chance of Match for press is: 0.19
Percent Chance of Match for press is: 0.25
----------End Signals In Press------------
For Visual of the last signal comparison go to ./imageOutput/LiveComparison.png
----------Start Signals In Press--------------
Percent Chance of Match for press is: 0.93
Percent Chance of Match for press is: 0.93
Percent Chance of Match for press is: 0.97
Percent Chance of Match for press is: 0.90
Percent Chance of Match for press is: 0.88
Percent Chance of Match for press is: 0.44
----------End Signals In Press------------
For Visual of the last signal comparison go to ./imageOutput/LiveComparison.png
Graph Comparison Output for 97% Match:
Conclusion:
You have now walked through successfully reversing a toggle switch remote for a security gate. You took a raw signal and created a working device using only a Yardstick and RFCrack.This was just a quick tutorial on leveraging the skillsets you gained in previous blogs in order to learn how to analyzeRF signals within embedded devices. There are many scenarios these same techniques could assist in.We also covered a few new features in RF crack regarding logging, graphing and comparing signals.These are just a few of the features which have been added since the initial release. For more info and other features check the wiki.
Aunque Windows haya tomado la delantera en los ordenadores, y así mismo haya incursionado en los dispositivos móviles, aún existen usuarios que no les agrada el sistema operativo por excelencia, tal vez sea por la cantidad de licencias que hay que adquirir para no incurrir en fraude o en gastos por compra de software compatibles al tratarse de un sistema sin código libre. Pues bien así como se presentó alguna vez Remix Os, un software que permitía combinar iOS y Windows, hoy te presentamos una alternativa para combinar Ubuntu con Windows.
De la misma manera como Windows ha evolucionado desde Windows XP hasta Windows 10, también Ubuntu ha logrado presentar nuevas actualizaciones y esta es una de las versiones más recientes, se trata de la actualización 19.10, una versión de código libre y adaptable en cualquier ordenador, recuerda hacer las particiones pertinentes antes de realizar cualquier instalación.
Aunque se le conoce con el serial 19.10, esta versión de Ubuntu tiene un nombre propio, Zesty Zapus, con lanzamiento único. Una versión que le dice adiós a las particiones de intercambio, entregando al usuario un archivo modificable en lugar de particiones o unidades de disco fragmentado. Otras ventajas radican en la posibilidad de mejorar el rendimiento del ordenador por su poco consumo de memoria RAM, una de las razones por la cual muchos usuarios lo prefieren. Todo el proceso se verá reflejado en tu ordenador, si sigues los pasos establecidos en el siguiente vídeo.
Presentamos este post como una alternativa para los usuarios que desean probar algunas bondades que puede ofrecer un sistema operativo diferente al ya mencionado Windows. Agradecemos al YouTuber BuclesUbuntu, por tomarse su trabajo muy en serio, presentándole a muchos usuarios los tutoriales con información explicita, pueden visitar su canal siguiendo este enlace: BuclesUbuntu
Agradecemos a todos nuestros usuarios por permitirnos llevarles este tipo de contenidos, si usted desea hacer algún aporte o sugerencia, puedes escribirnos en la barra de comentarios, estaremos atentos a su participación. También te recomendamos leer: (Cómo instalar Windows en unidades externas)